Supplies:
- Crayola Broad Line Markers - 8 Count
- Crayola Fine Line Markers - 12 Count
- Crayola Marker & Watercolour Paper - 12.5 cm x 12.5 cm (5" x 5") - enough for 9 pieces for each student
- Crayola Scissors
- Crayola Washable Glue Sticks
- Rulers
- Construction Paper - 45.7 cm x 61 cm (18" x 24")
Steps:
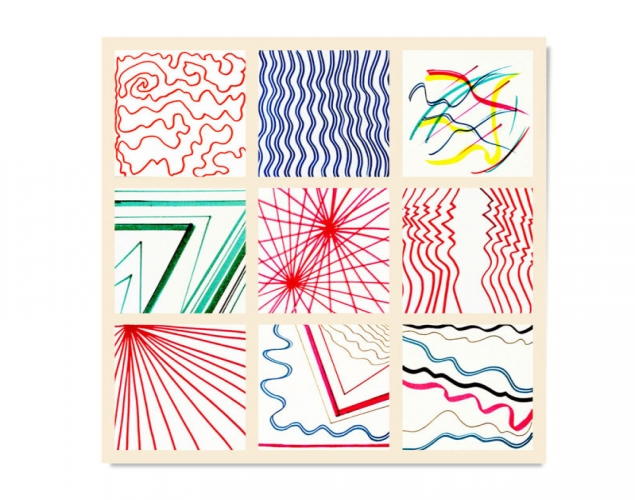
1
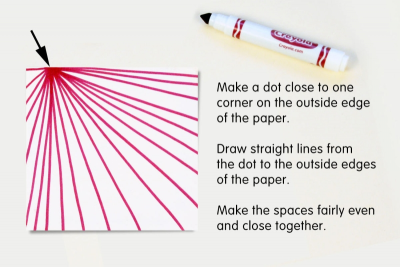
- Make a dot close to the corner near the outside edge of the paper.
- Draw straight lines from the dot to the outside edges of the paper.
- Make the spaces between the lines fairly even and close together.
2
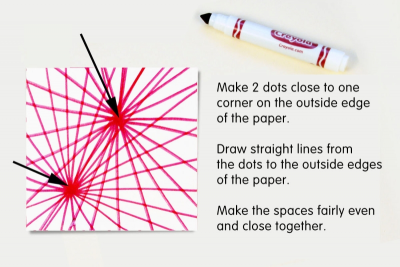
- Make 2 dots not too close together and near the outside edges of the paper.
- Draw straight lines from the dots to the outside edges of the paper.
- Make the spaces between the lines fairly even and close together.
3

- Imagine a line of symmetry dividing the paper in half.
- Place your marker on the outside edge of the paper and near the line of symmetry.
- Draw a wavy line beside the line of symmetry from one side of the paper to the other.
- Repeat this line over and over again until you fill one half of the paper.
- Draw the mirror reflection of the first line on the other side of the line of symmetry.
- Repeat this line over and over again until you fill the other half of the paper.
4
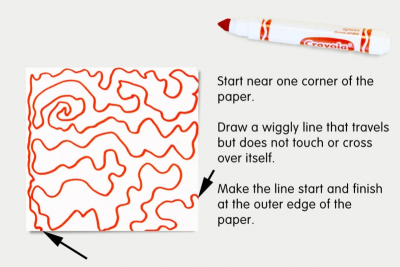
- Start near one corner of the paper.
- Draw a wiggly line that travels all over the paper but does not touch or cross over itself.
- Make the line start and finish at the outer edge of the paper.
5
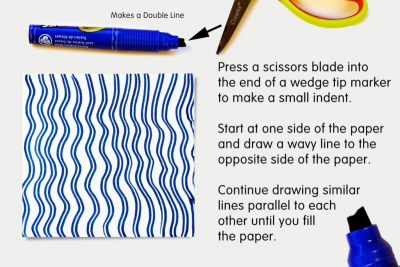
- Press a scissors blade into the end of a wedge tip marker to make a small indent.
- The marker will make a double line.
- Start at one side of the paper and draw a wavy, double line to the opposite side.
- Draw a similar line parallel to the first one.
- Continue drawing similar lines parallel to each other until you fill the paper.
6
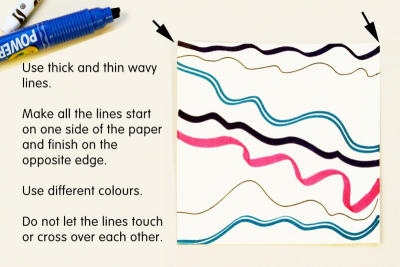
- Use only wavy lines.
- Use thick lines and thin lines.
- Make all the lines start at one edge of the paper and finish at the opposite edge.
- Use different colours.
- Do not let the lines touch or cross over each other.
7
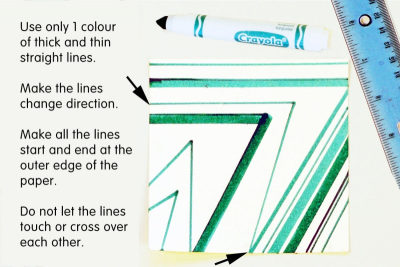
- Use only straight lines.
- Use thick lines and thin lines.
- Make the lines change direction.
- Make all the lines start and finish at the outer edges of the paper.
- Use one colour.
- Do not let the lines touch or cross over each other.
8
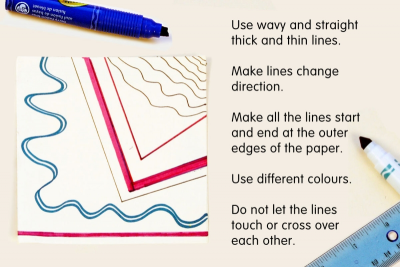
- Use wavy and straight lines.
- Use thick lines and thin lines.
- Make lines change direction.
- Make all the lines start and finish at the outer edges of the paper.
- Use different colours.
- Do not let lines touch or cross over each other.
9

- Use free flowing, energetic lines.
- Use thick lines and thin lines.
- Use different colours.
- Make the lines change direction.
- Let the lines touch and cross over each other.
- Do not let the lines touch the outer edges of the paper.
10
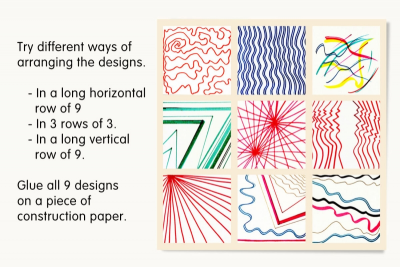
- Try different ways of arranging the designs, for example,
- beside each other in a long, horizontal row of 9
- in 3 rows of 3
- beneath each other in a long, vertical row of 9 - When you are satisfied with an arrangement glue all 9 designs on a piece of construction paper or Bristol board.
Subjects:
Grades:
Grade 4,
Grade 5,
Grade 6,
Grade 7,
Grade 8,
Grade 9