Supplies:
- Crayola Air Dry Clay
- Crayola Paint Brushes
- Slip
- Water Containers
- Rolling Pins or Piece of Dowel
- Plastic Placemats - 1 per student
- Pencils
- Garlic Press
- Paper Clips
- Masking Tape
- Wooden Candy Apple Sticks
Steps:
1
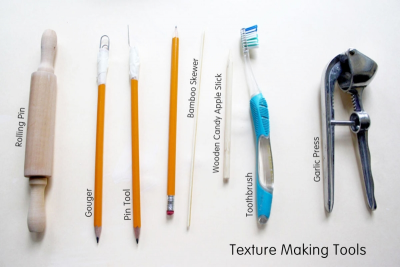
TOOLS
- Make a gouging tool by taping a large paperclip to the end of a pencil.
- Make a pin tool by taping an open paperclip to the end of a pencil.
- Gather other tools such as a:
- rolling pin;
- dowel;
- garlic press;
- toothbrush;
- bamboo skewer;
- wooden candy apple stick.
2
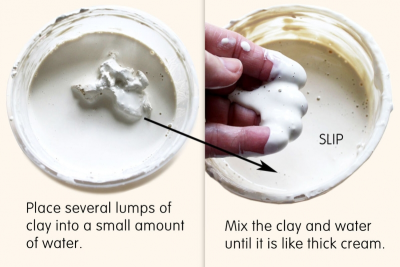
SLIP
- You use slip to help hold the clay together.
- To make slip begin by placing several lumps of clay into a container and adding a small amount of water.
- Mix the clay and water together.
- If it is too watery add more clay and continue to squeeze the clay through your fingers until it disolves.
- Mix the clay and water together until it is like thick cream.
3
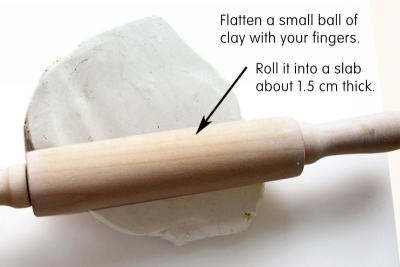
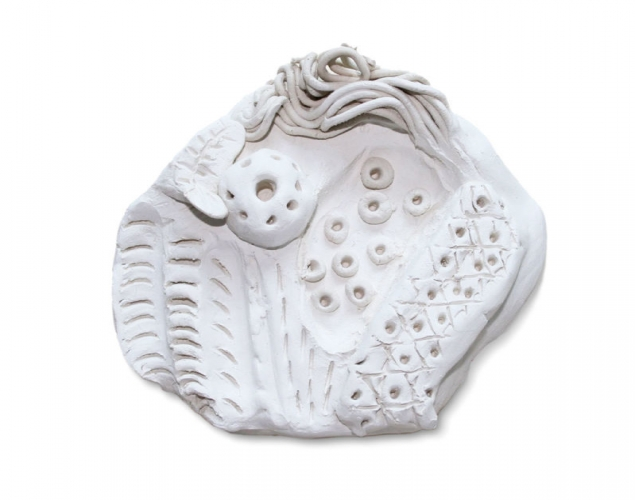
SLAB
- Make a small ball of clay and flatten it with your fingers and the palm of your hand.
- Use a rolling pin or piece of dowel to roll it into a flat shape about 1.5 cm thick - this is called a slab.
4
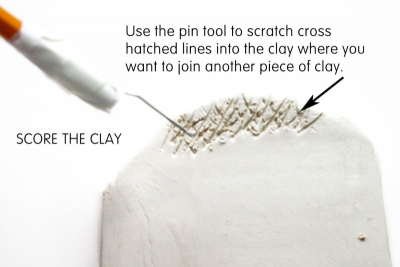
SCORE
- Use the pin tool to scratch cross hatched lines into the clay where you want to join another piece of clay.
- This is called scoring the clay.
5
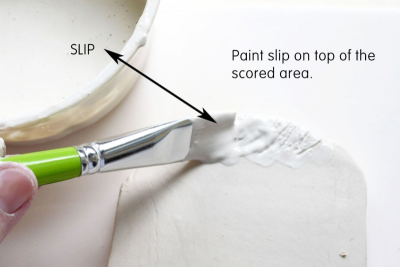
SCORE AND SLIP
- Paint slip on top of the score lines.
- This is called score and slip technique.
6
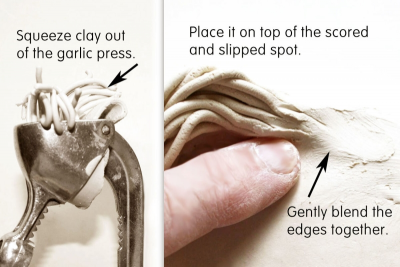
- Place a small ball of clay into the garlic press and squeeze it out.
- Place it on top of the scored and slipped spot.
- Gently blend the edges into the slab to make a smooth join.
7
COILS
- Roll a long thin coil of clay.
- As you roll the clay spread your fingers and apply gentle, even pressure to slowly stretch the clay.
- Score and slip the spot where you will join the coil to the slab.
- Place the coil on the prepared spot.
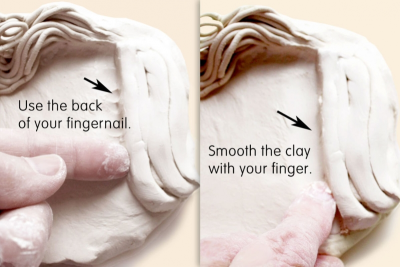
- Use the back of your fingernail to join the edges to the slab.
- Smooth the clay with your finger.
- Add a small amount of slip if needed.
8
LEVELS
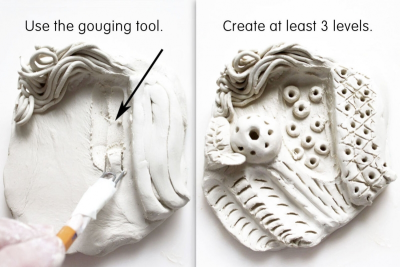
- Use the gouging tool to scrape away some of the clay from the slab.
- Continue adding and removing clay to create at least 3 levels.
- Experiment with ways to make different textures.
- Always remember to score and slip before adding any pieces of clay.
Subjects:
Grades:
Grade 1,
Grade 2,
Grade 3,
Grade 4,
Grade 5,
Grade 6,
Grade 7,
Grade 8,
Grade 9,
Grade 10