Supplies:
- Crayola Scissors
- Crayola Braod Line Markers - Assorted Colours - 16 Count
- Crayola Marker & Watercolour Paper - 7.6 cm x 22.9 cm (3" x 9")
- Crayola Washable Glue Sticks
- Rulers
- Pencils
- Plastic Sheet Protectors - 1 per student
- Cardstock Paper - 21.5 cm x 27.9 cm (8½ " x 11") - 1 piece per student
- Plastic Placemats - 1 per student
- Spray Water Bottles
- Paper Towels
- Scrap Paper - 22.9 cm x 30.5 cm (9" x 12")
Steps:
1

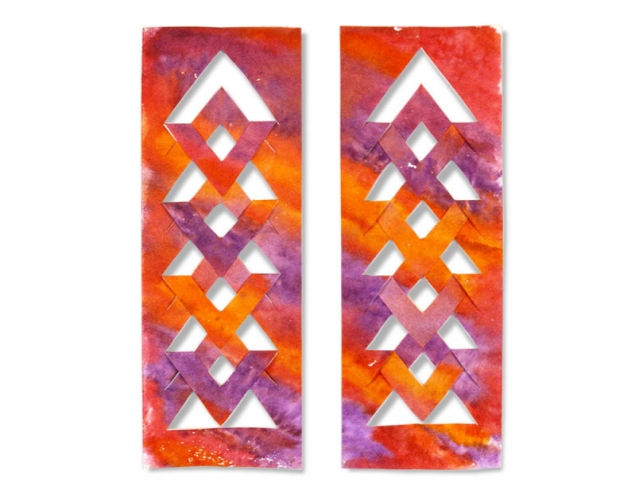
PART ONE
- Draw a rectangle 15.2 cm x 22.9 cm (6" x 9") in the centre of a piece of cardstock paper.
- Place the cardstock paper inside a plastic sheet protector. This will be your printing plate.
- Place the printing plate on your desk with the rectangle facing up.
- Use the flat side of the markers to draw a design on the plastic surface.
- Draw the design to fit the rectangle.
- Use lots of colour.
2
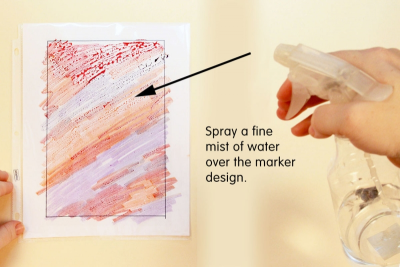
- Make sure the spray bottle is set so it gives a fine mist spray.
- Lightly spray a fine mist of water over the marker design.
3
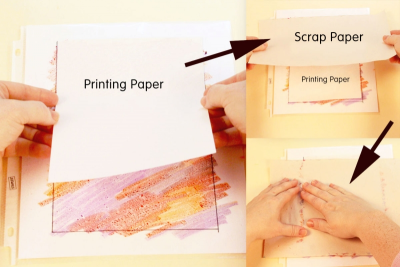
- Place a piece of printing paper on top of the wet ink. (Marker and Watercolour paper 15.2 cm x 22.9 cm)
- Place a piece of scrap paper on top of the printing paper.
- Gently rub the entire surface.
4
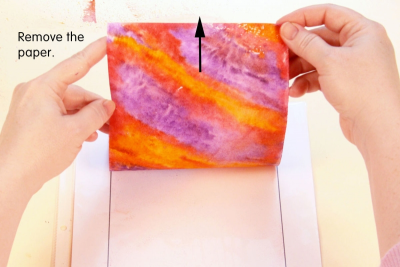
- Remove the paper from the printing plate.
- Allow the paper to dry for about a minute.
5
PART TWO
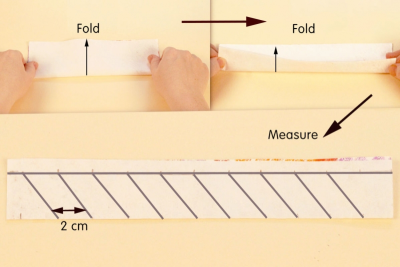
- Place the paper on your desk with the colour side facing up.
- Fold the paper in half lengthwise (long end to long end).
- Fold it in half lengthwise again.
- Lightly draw a line parallel to the long side of the paper 1 cm from the open edge.
- Measure and mark 2 cm spaces along the line.
- Measure and mark 2 cm spaces along the fold so that they are exactly opposite the other marks.
- Draw a line on an angle from the first 2 cm mark on the folded edge to the 4 cm mark on the line.
- Continue drawing lines 2 cm apart on an angle, and parallel to the first line until you get to the end.
6
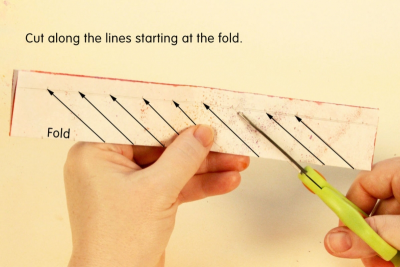
- Cut along the lines, starting at the fold and stopping at the line.
7
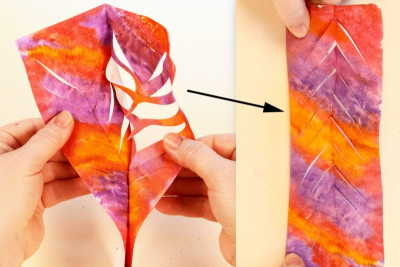
- Open the paper and gently flatten it.
- Fold the paper in half lengthwise with the colour facing out.
- Place the paper on your desk with the arrow shapes pointing up.
8
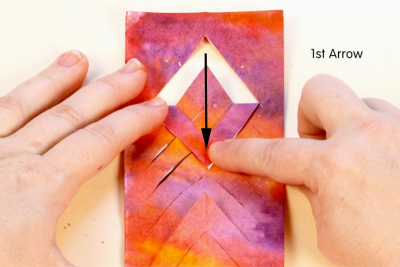
- Begin at the top.
- Each arrow shape will have 2 layers.
- Fold the first arrow shape down and crease it firmly at the sides.
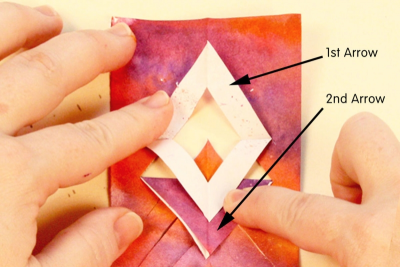
9
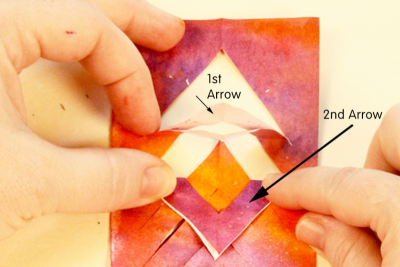
- Look to the edge of the cuts for the 2nd arrow below the 1st arrow.
- Fold that arrow down.
10
- Open the first arrow.
- It looks like a little bird's open mouth.
11
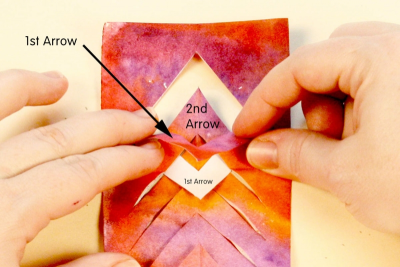
- Insert the 2nd arrow between the layers of the first arrow.
- Fold the top layer of the 1st arrow down.
- The 2nd arrow should be tucked between the 2 layers of the first arrow.
- Continue in this way until you have folded all the arrow shapes.
12
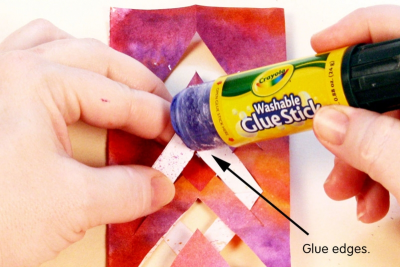
- Use a glue stick to fasten the edges of the paper and the ends of the arrows in place.
13
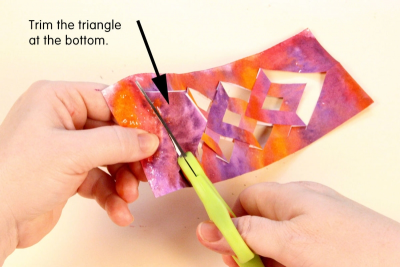
- Trim the triangle at the bottom.
Subjects:
Grades:
Grade 4,
Grade 5,
Grade 6,
Grade 7,
Grade 8