Supplies:
- Crayola Modeling Clay
- Crayola Glue Sticks
- Crayola Sketchbooks
- Crayola Markers
- Bristol Board - assorted colours - 30.5 cm x 45.7 cm (12" x 18") - 1 per student
- Bristol Board - 7 pieces per student - 6.4 cm x 8.9 cm (2.5" x 3.5")
- Pencils
- Clay Modeling Tools - optional
Steps:
1

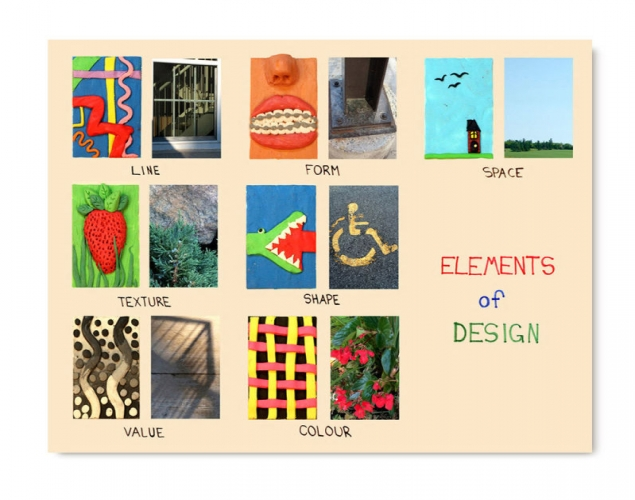
- LINE is a path created by a moving point.
- Lines can be thick, thin, straight, curved, solid, broken, fuzzy, crisp and various colours.
- They can be long, short and can change direction.
- In design, curved lines give a more dynamic, fluid look to the work.
- Straight lines appear more formal and structured.
- Use the modelling clay to create a line design on one of the cards.
- Be deliberate in your use of at least 5 different kinds of lines to create a specific mood.
2
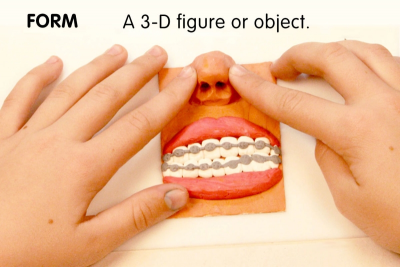
- FORM is a 3-dimensional object or figure.
- Forms can be organic or geometric, open or closed.
- In design, forms can be 3-dimensional, or be 2-dimensional but appear to be 3-dimensional because of shading and colour.
- Use the modelling clay to create a form design on one of the cards.
- Be deliberate in your use of form to convey a specific idea.
3
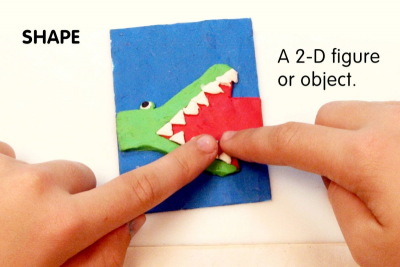
- SHAPE is a 2-dimensional, figure or object.
- Shapes can be organic, geometric, or abstract, open or closed.
- In design, deliberate use of specific shapes can give a design a certain mood or feeling. For example, vertical shapes suggest strength; horizontal shapes suggest peace; curved shapes suggest happiness; and sharp shapes suggest energy.
- Use the modelling clay to create a shape design on one of the cards.
- Be deliberate in your use of shapes to convey a specific idea.
4
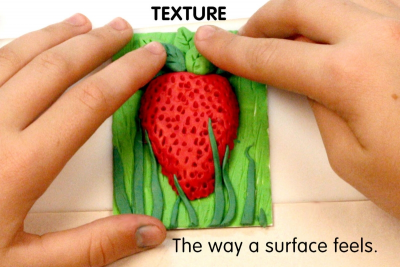
- TEXTURE is the way a surface feels, or looks as if it feels.
- Textures can be rough or smooth, subtle or pronounced.
- In design, deliberate use of textures can add to the mood or feeling and have a surprising effect on how the design comes across.
- Use the modelling clay to create a texture design on one of the cards.
- Be deliberate in your use of texture to convey a specific idea.
5
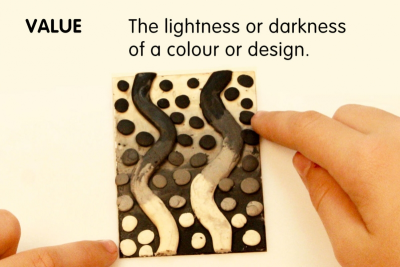
- VALUE is how light or dark a specific design is.
- Designs can be high key or low key.
- High key designs have mostly light values and create a happy mood.
- Low key designs have mostly dark values and tend to create a serious mood.
- Use the modelling clay to create a value design on one of the cards.
- Be deliberate in your use of value to convey a specific idea.
6
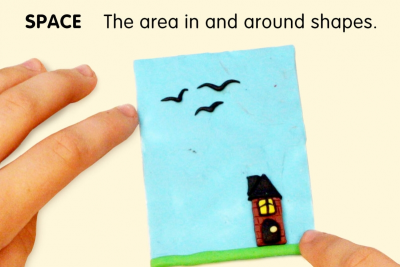
- SPACE is the area around, inside or between shapes or forms.
- In design there are two kinds of space – positive and negative.
- Positive space is the area occupied by design elements.
- Negative space (also called white space) is the area that is left over.
- Lots of negative space in a design can give a light, open feeling.
- Lack of negative space can leave a design feeling cluttered and too busy.
- Use the modelling clay to create a space design on one of the cards.
- Be deliberate in your use of negative space to create a specific mood.
7

- COLOUR is a hue that results from light reflecting off a surface, e.g., blue, yellow
- In design, colour conveys powerful messages, for example, for many people warm colors suggest excitement, creativity and energy; cool colors suggest peace, harmony and calm.
- Use the modelling clay to create a colour design on one of the cards.
- Be deliberate in your use of colour to convey a specific idea.
8
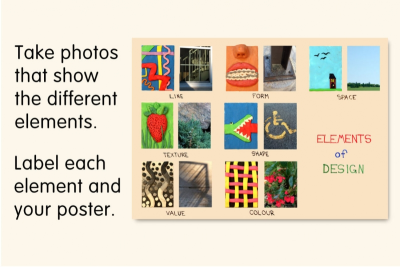
- Use your device to take photographs in your environment that emphasize each of the elements, or download images from the Internet.
- Crop each photograph to match the size of your design cards – 6.4 cm x 8.9 cm (2.5" x 3.5") and print them.
- Arrange your elements design cards and photographs beside each other and glue them to a piece of Bristol board.
- Label each element and title the Bristol board Elements of Design.
Subjects:
Language Arts
Grades: