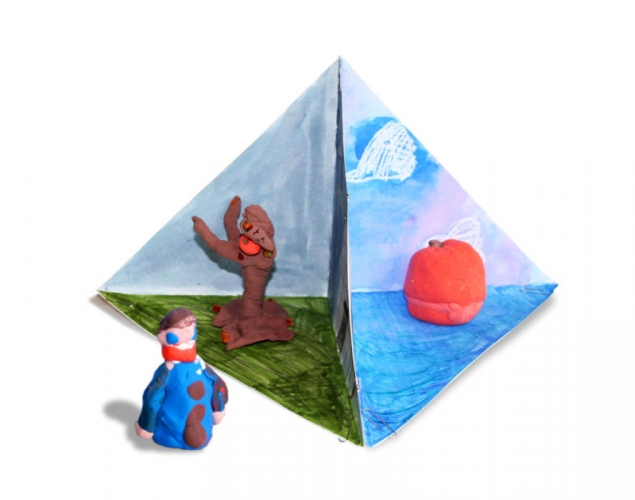
RETELLING A STORY – Creating and Using PropsStudents work in groups of four, choose the beginning, middle - part one, middle - part two, or end of a story they have read and use markers and crayons to create a triarama that shows the setting in their part of the story, and Model Magic to make a character and props. Then they take turns retelling their part of the story using their creations.
Students work in groups of four, choose the beginning, middle - part one, middle - part two, or end of a story they have read and use markers and crayons to create a triarama that shows the setting in their part of the story, and Model Magic to make a character and props. Then they take turns retelling their part of the story using their creations.
Supplies:
- Crayola Washable Markers - 24 Count
- Crayola Paint Brushes - 5 Count
- Crayola Model Magic - Assorted Colours
- Crayola Scissors
- Crayola Regular Crayons - 24 Count
- Bristol Board - 30.5 cm x 30.5 cm (12" x 12") - 1 piece per student
- Paper Clips
- Plastic Container Lids for Palettes - 1 per student
- Water Containers
- Masking Tape
- Coverstock Paper - 4 cm x 9 cm (2" x 4") - 1 per student
Steps:
1
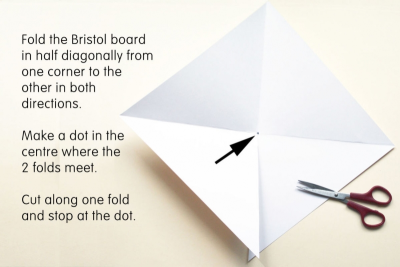
- Begin with a square of Bristol board 30 cm x 30 cm (12" x 12").
- Fold the Bristol board in half diagonally from one corner to the other.
- Make a firm crease.
- Open the Bristol board up and fold it diagonally in the opposite direction.
- Make a firm crease.
- Make a dot in the centre of the Bristol board where the two folds meet.
- Cut along one of the folds and stop at the dot.
2
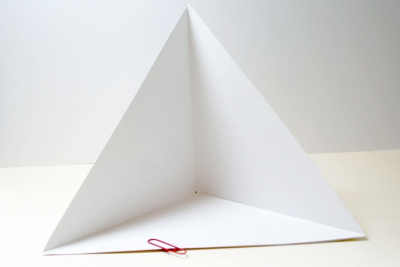
- Mark an X on one of the flaps.
- This side will be tucked under the other. - Fold the Bristol board up and place one triangle go over the one with the X.
- Notice what will be the background of your setting – the two vertical sides, and what will be the ground – the flat horizontal part .
- Open the Bristol board up and do your drawing and painting on it while it is flat.
- Do not paint on this flap with the X.
3
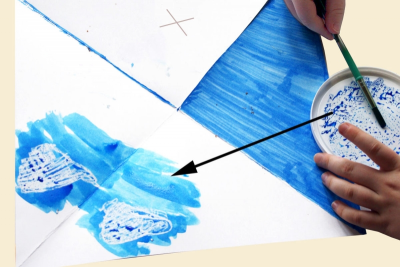
- Do not paint on the flap with the X.
- Use crayon and marker to colour the details of your setting.
- To use the marker like paint, draw some marker onto a plastic lid and paint into the marker with water to liquefy it.
4
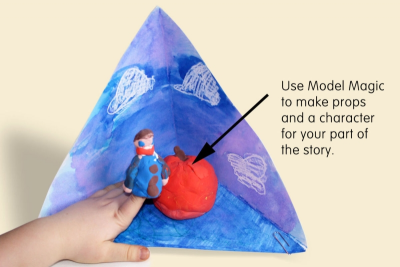
- Use Model Magic to create props and characters for your part of the story.
- To make a small finger puppet follow the instructions in the Fun Finger Puppets lesson plan available on this website.
5
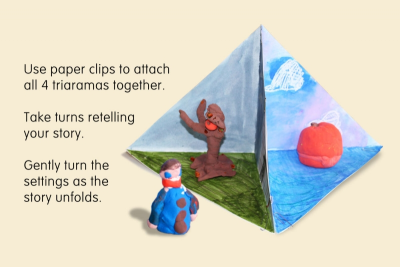
- Use paper clips to attach all 4 triaramas together.
- Make sure they are in the correct order – beginning, middle - part one, middle - part two, end.
- Take turns retelling your story, gently turning the settings as the story unfolds.
- Use the props to help you remember important details.
Subjects:
Language Arts,
Mathematics,
Visual Arts
Grades:
Grade 3,
Grade 4,
Grade 5,
Grade 6