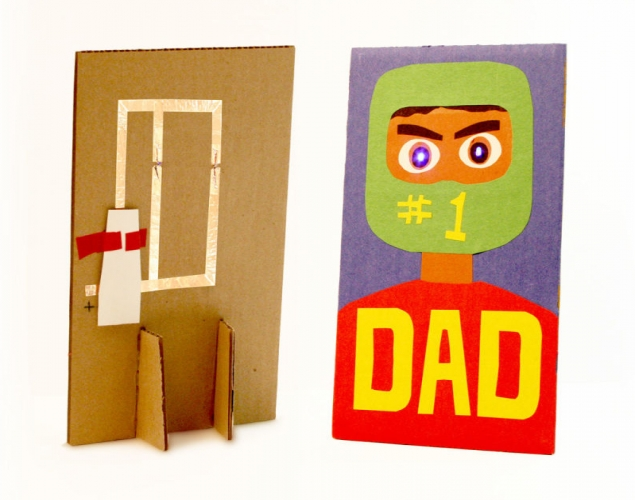
PARALLEL PAPER CIRCUIT – Symmetry, Contrast, EmphasisStudents use conductive copper tape to build a parallel paper circuit with a maximum of 3 LEDs. They use the circuit to light up a picture they have created using symmetrical shapes and letters cut out of construction paper.
Students use conductive copper tape to build a parallel paper circuit with a maximum of 3 LEDs. They use the circuit to light up a picture they have created using symmetrical shapes and letters cut out of construction paper.
Supplies:
- Crayola Construction Paper - 22.9 cm x 30.5 cm (9" x 12") - Variety of Colours
- Crayola Scissors
- Crayola Glue Sticks
- Crayola White Glue
- Crayola Sketchbooks
- ¼" Self-Adhesive Conductive Copper Tape
- 3 mm LEDs
- CR2032 Coin Cell Batteries - 1 per student
- Duct Tape
- Cardstock Paper
- Corrugated Cardboard - 15 cm x 23 cm (6" x 9") - 1 ½ per student
Steps:
1
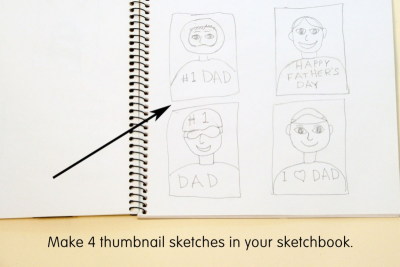
- Make 4 thumbnail sketches in your sketchbook.
- Use symmetrical shapes for the main images.
- Include at least 1 word in your design.
2
- Choose the colours you want to work with.
- Cut out rectangles of paper for each of the main shapes.
- Fold the rectangles to cut them into symmetrical shapes.
- Choose contrasting colours for the details.
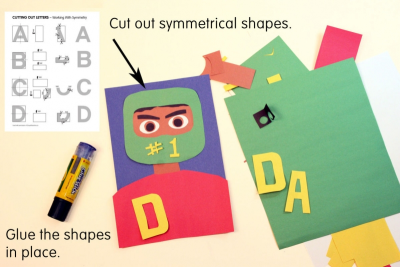
- Follow the instructions to cut out your letters. (Downloads - CuttingOutLetters.pdf)
- Arrange the shapes on the background colour to be sure they all fit.
- Once you are satisfied with the design glue the pieces in place.
3
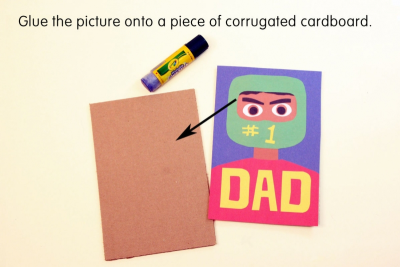
- Use a glue stick to apply lots of glue to the back of the picture.
- Glue the picture onto a piece of corrugated cardboard.
- Press the paper down so it is flat and smooth.
4
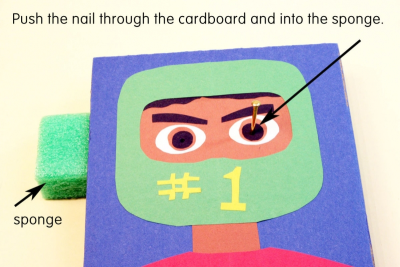
- Place the picture on a small piece of foam sponge.
- Use a small nail to push holes into the cardboard where you want the LEDs to be.
- Push the nail through the cardboard and into the sponge.
5
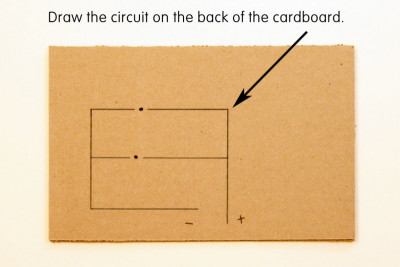
- Draw the circuit on the back of the cardboard.
- Make sure the lines go to the holes you have made.
- Leave a small gap between the holes.
6
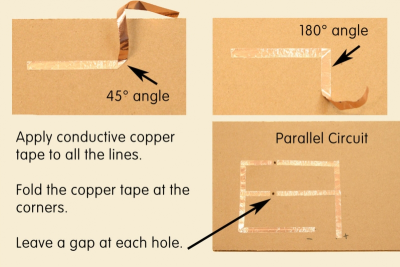
- Apply copper tape to all the lines.
- Smooth the copper down with your finger.
- Fold the tape at the corners.
- fold it at a 45° angle away from the direction you are going
- make a crease then fold it back along the circuit line - 180° angle - Leave a gap in the copper tape at each hole.
7
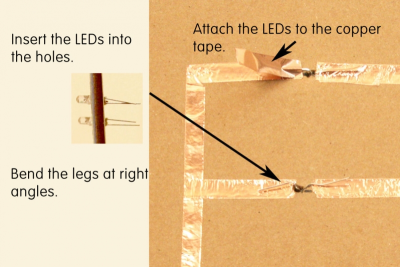
- Insert the LEDs into the holes.
- Bend the legs at a 90° angle.
- Use a small piece of copper tape to attach the LED to the copper tape on either side of the hole.
- Make sure the long leg of the LED is attached to the positive side of the circuit.
8
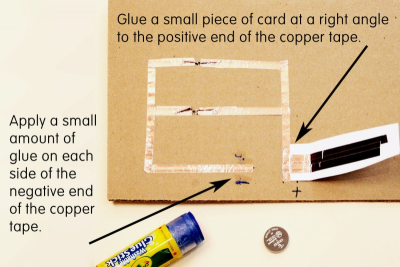
- Glue a strip of cardstock long enough to reach the battery at a right angle to the positive end of the copper tape. This will be the switch to turn the LEDs on and off.
- Stick several strips of copper tape to the cardstock.
- Make sure the copper tape runs onto the positive end of the circuit tape.
- Use a glue stick to apply a small dab of glue to each side of the negative end of the copper tape.
- Place the battery on top of the copper tape so the glue holds it in place.
9
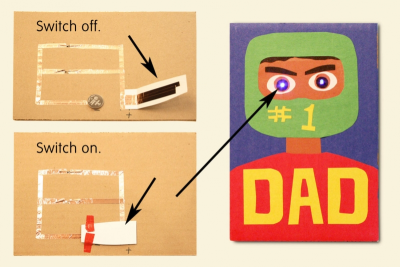
- Close the paper switch to test the circuit.
- Make sure the copper tape on the cardstock makes contact with the battery.
- The LEDs should light up.
- Place 2 small pieces of duct tape on each side of the cardstock switch to hold it in place.
- Make sure the duct tape does not touch the copper tape.
10
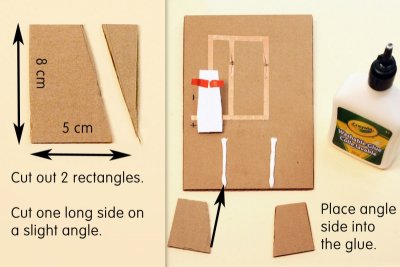
- Cut 2 cardboard rectangles 5 cm x 8 cm.
- Cut one long side of each rectangle on a slight angle – about 75°.
- Use white glue to attach the cardboard pieces to the back of the corrugated cardboard.
- draw 2 lines of glue on the back of the picture
- place the angle side of the small rectangle into the glue and line up the bottom of the rectangle with the bottom of the picture
- hold the cardboard in place for a few seconds until the glue sets - Allow to dry for about an hour.
11
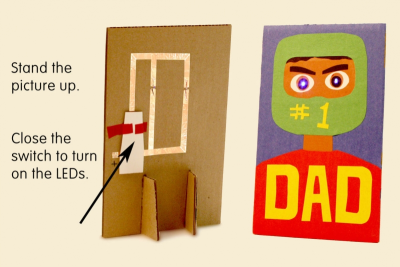
- Stand the picture up.
- Close the switch to turn on the LEDs.
Subjects:
Grades:
Grade 3,
Grade 4,
Grade 5,
Grade 6,
Grade 7,
Grade 8