Supplies:
- Crayola Construction Paper - 22.9 cm x 30.9 cm (9" x 12")
- Crayola Washable No-Run School Glue
- Pony Tail Elastics
- Bamboo Skewers - 30 cm (12") - 1 per student
Steps:
1
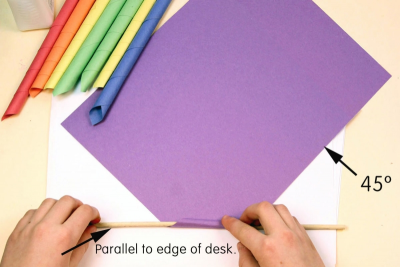
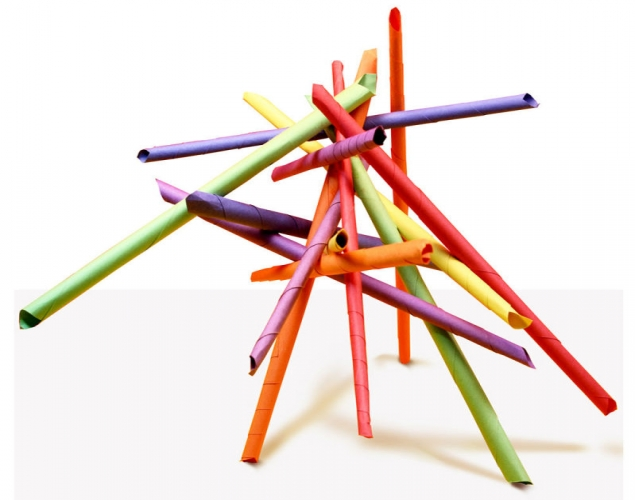
PAPER ROD
- Place a piece of construction paper flat on your desk and at a 45-degree angle to the edge of your desk.
- Place the skewer on one corner of the paper so that it is parallel to the edge of your desk.
- Slowly begin to roll the paper around the skewer keeping it fairly tight.
2
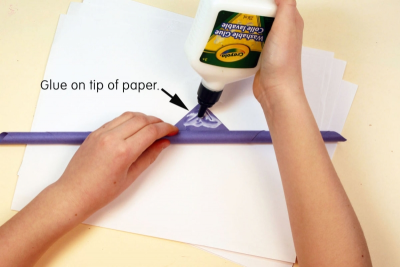
- When you are almost at the end put a small amount of glue on the tip of the paper, then finish rolling the paper.
- Press the glued tip against the rolled paper to hold it in place.
- Remove the skewer and you have a paper rod.
- Make about 12 rods in various colours.
3
SCULPTURE
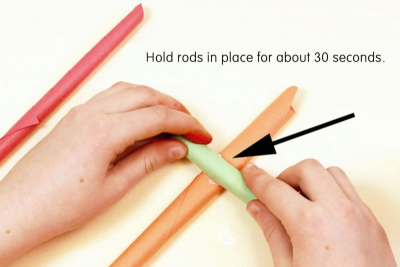
- Use 3 rods to create the base for your sculpture.
- Make sure the base is very stable and well balanced so it can support all the other rods that you add to it.
- Place a small amount of glue on one of the rods and press a second rod into it.
- Gently press the rods together and hold them in place for about 30 seconds.
4
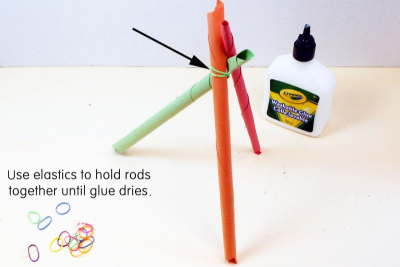
- Add the third rod to create a tripod structure.
- think about where you want the rods to join – midway, two-thirds up, or somewhere in between - Use an elastic to hold the rods together while the glue dries.
5
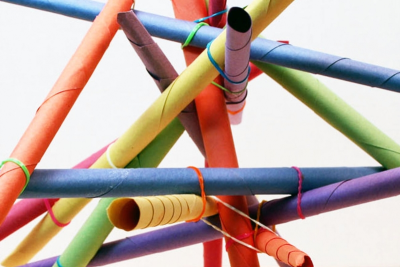
- Once you have a sturdy base begin to add more rods to create your sculpture.
- Add each rod in such a way that it touches 2 other rods but does not touch the ground.
- Place each rod so that it creates a new angle and is not parallel to any other rods.
- Use an elastic to hold the rods together while the glue dries.
6
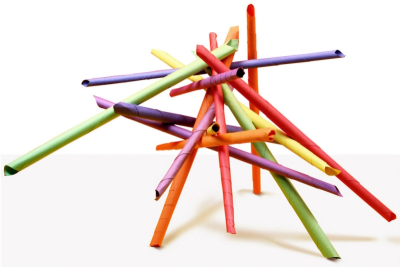
- Continue adding rods until you are satisfied with your sculpture.
- As you add more rods make sure they do not touch the ground.
- From time to time gently turn the sculpture around to view it from all points of view.
- It should:
- be stable enough to be moved without falling apart;
- have many different angles;
- have no two rods that are parallel to each other. - When you are satisfied with your work set it aside to let it dry.
- Once it is dry, remove the elastics and give it a title.
Subjects:
Language Arts,
Mathematics,
Science,
Visual Arts
Grades:
Grade 4,
Grade 5,
Grade 6