Supplies:
- Crayola Modeling Clay - Jumbo Pack
- Crayola Scissors
- Aluminum Foil
- Thin Corrugated Cardboard - Small Pieces
- Bamboo Skewers - 1 per student
- Toothpicks
- Rolling Pins
- Rulers
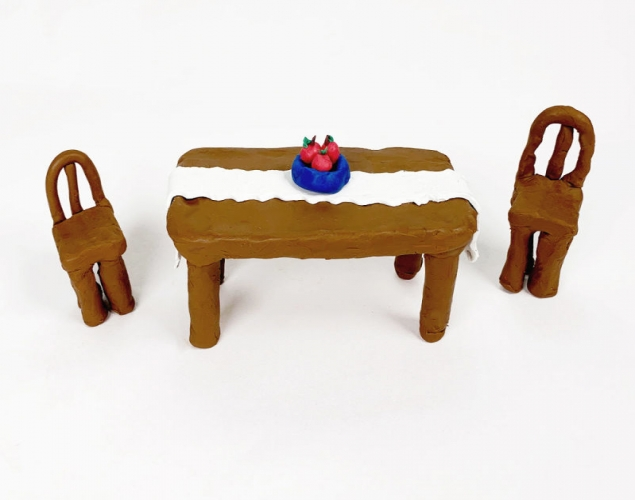
Steps:
1
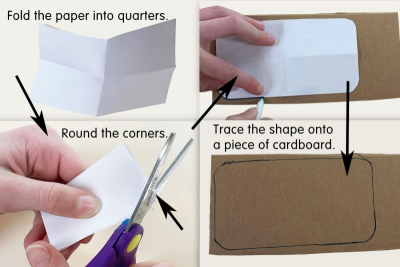
- Fold a piece of paper 6 cm x 12 cm into quarters.
- Round off the outside open corners.
- Open the paper.
- Trace the shape onto a piece of cardboard.
- Cut out the cardboard shape.
2
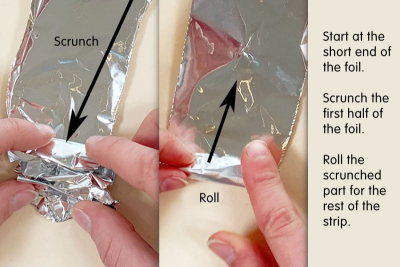
- Use a strip of aluminum foil 4 cm x 10 cm.
- Start at a short end.
- Scrunch the first half of the foil.
- Roll the scrunched part of the foil for the rest of the strip.
- Make a smooth, firm cylinder.
- Repeat this process to make 4 cylinders in total.
- These will be the armatures for the table legs.
3
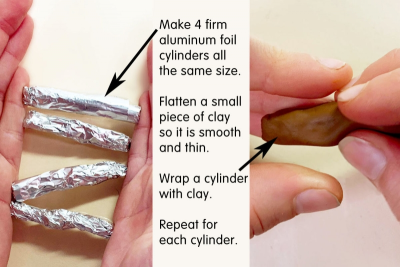
- Make 4 firm, aluminum foil cylinders all the same size.
- Flatten a small piece of clay so it is smooth and thin.
- Wrap the clay around a cylinder.
- Repeat for each cylinder to make 4 legs.
4
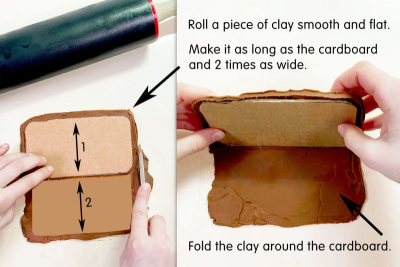
- Roll a piece of clay smooth and flat.
- Make it fairly thin.
- Place the cardboard shape on the clay.
- Use it to measure a piece that is as long as the cardboard and 2 times its width.
- Cut out the shape.
- Fold the clay around the cardboard shape like a sandwich.
- Press the edges together and smooth the surfaces.
5
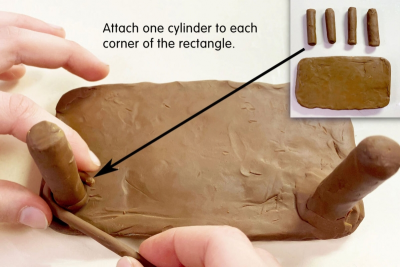
- Attach one cylinder to each corner of the rectangle.
- You may want to wrap a thin coil of clay around the base of each cylinder to make sure the pieces stick.
- Flip the table over and make sure it is sturdy and balanced.
6
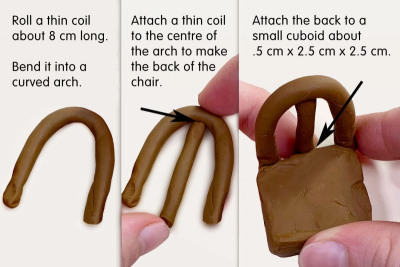
CHAIR BACK
- Roll a thin coil of modeling clay about 8 cm long.
- Bend it into a curved arch.
- Attach a thin coil about 4 cm long to the centre of the arch.
CHAIR SEAT
- Roll a small ball of clay.
- Flatten it between your thumb and finger.
- Squeeze it into a square to make a small cuboid about .5 cm x 2.5 cm x 2.5 cm.
CHAIR
- Attach the back to one end of the cuboid.
- Make 3 cm long legs the same way you did for the table.
- Attach the legs to the chair seat.
- Flip the chair over and make sure it is sturdy and balanced.
7
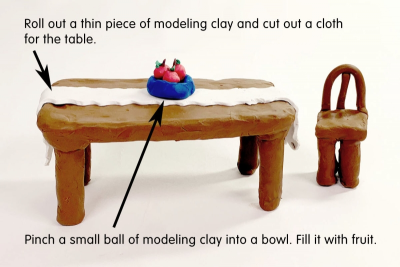
- Roll out a thin piece of modeling clay.
- Cut a strip to make a cloth for the table.
- Add a fringe or other texture to it.
- Pinch a small ball of clay into a bowl.
- Fill the bowl with small balls of clay decorated to look like fruit.
Subjects:
Language Arts,
Mathematics,
Visual Arts,
Media Literacy
Grades:
Grade 4,
Grade 5,
Grade 6,
Grade 7,
Grade 8,
Grade 9