PHOTOSHOP BASICS – Adding ColourStudents use coloured pencils or markers to colour a colouring page, then use it as a guide to use Photoshop to match and add colour to the same digital image.
Students use coloured pencils or markers to colour a colouring page, then use it as a guide to use Photoshop to match and add colour to the same digital image.
Supplies:
- Crayola Coloured Pencils - 24 Count
- Crayola Fine Line Markers - 24 Count
- Digital Image - Downloads
- Photoshop
Steps:
1
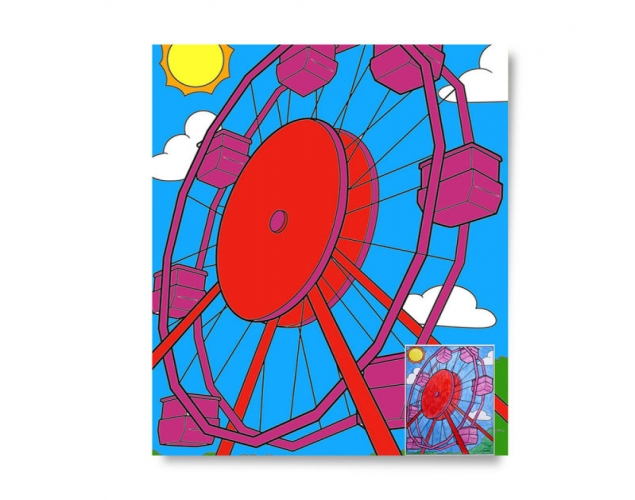
- Choose the image you want to work with. (Downloads -Adding1_Colour.pdf; Adding2_Colour.pdf; Adding3_Colour.pdf; Adding4_Colour.pdf)
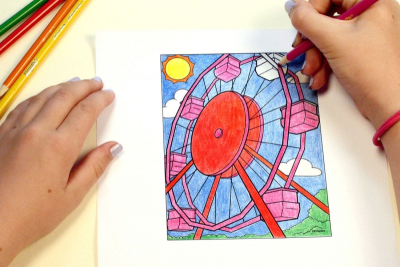
- Use coloured pencils or markers to colour it.
- These will be the colours you will work with in Photoshop.
2
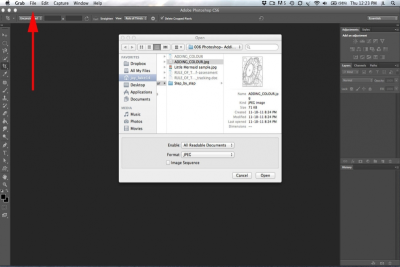
- Choose File > Open to open a Photoshop document.
- Select the same file as you just finished colouring, for example, Digital_Adding_Colour1.pdf.
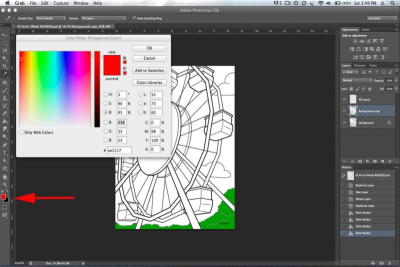
3

- Click on the Set Foreground Colour (colour picker) in the toolbar to change the foreground colour.
- Use the colour picker to pick a colour that is as close as possible to your hand coloured drawing for the Hue, Saturation and Brightness. In this case we have selected a green tone.
- Click on the slider bar to move the green tone to your desired HSB. You will see the numbers change as you make this change.
- Once you are happy with the colour, click OK.
4
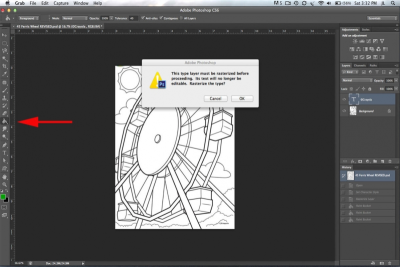
- Choose the Paint Bucket tool from the tool bar. When you attempt to fill in the area a warning message will appear asking you if you want to rasterize the image. Rasterizing is the process of turning vectors, or text layers, or layer effects, or any other kind of graphics, into a simple bitmap image made of pixels.
- Click OK.
5
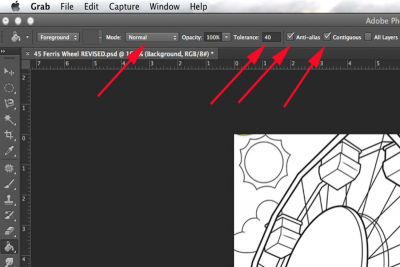
- Confirm that the following boxes in the top menu are set as follows:
Mode - Normal
Tolerance - 40
Anti-alias - checked
Contiguous - checked
6
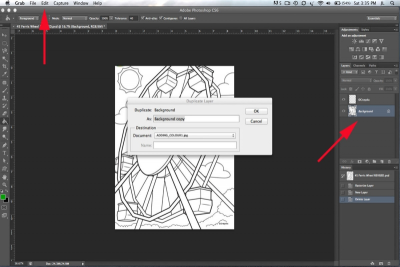
- Click on the Background layer found on the right of your screen.
- Go to Edit > Duplicate to make a background copy
- Make sure you work on the Background Copy and do not make changes to the original just in case you need to go back to it.
7
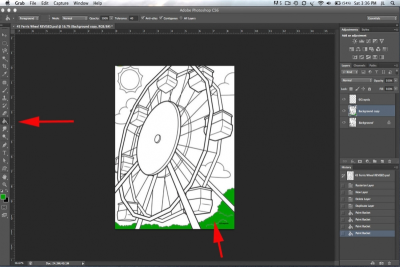
- Choose the Paint Bucket tool from the tool bar menu.
- Place the bucket inside the area you want to fill with colour, and click the mouse.
- Colour will fill the area inside the outline of the shape.
8

- Click on File > Save As and save your document as yourname_PS_colouring.jpg
9
- Click on the Set Foreground Color in the toolbar to change the foreground colour.
- Use the colour picker to pick a color for the HSB Colour.
- Use your slider to get the colour as close as possible to the colour you used in your hand coloured colouring page.
- When you are satisfied with the colour, click OK.
10
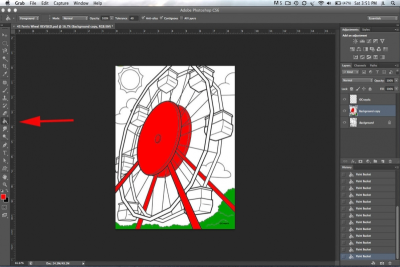
- Choose the Paint Bucket tool from the tool bar.
- Place the bucket over each area of the Ferris wheel you want to fill with that colour, and click the mouse.
- Colour will fill the areas inside the outline of each shape.
- Click on File > Save to save your changes.
11

- Repeat these steps until the image is completely filled with colour.
- Try your best to match the HSB on your digital image as closely as possible to your hand coloured image.
- Remember to click on File > Save to save your document after each change you make to it.
- Check to be sure you have completed all the steps and do one final save.
Subjects:
Language Arts,
Visual Arts,
Media Literacy
Grades:
Grade 6,
Grade 7,
Grade 8,
Grade 9,
Grade 10